
It is very important to handle the pages on both orientation Landscape and Portrait to improve the user experience. So we need to adjust the existing view (without recreating it) in such a way that looks good in Landscape and Portrait mode. Xamarin forms handle orientation changes by default. So In this article, I’m going to show you how to rotate views on orientation change without recreating layout.
Let’s Start
To create such a type of page in xamarin forms we will use FlexLayout and VisualStateManager.
What is FlexLayout?
FlexLayout in xamarin forms is a layout which is similar to StackLayout. FlexLayout can arrange its children either horizontally or vertically in the stack. It is also capable of wrapping its children if there are many children to fit in a single row or column. You can learn more about FlexLayout here.
What is VisualStateManager?
VisualStateManager in xamarin forms is a way to make visual changes to UI from code behind. It introduces the concept of states. Let’s take an example of a button to explain states, Button has Normal state, Disabled state and Pressed state. We can also create custom states. You can learn more about VisualStateManager here.
In this sample demo I will create two custom states that are Portrait state and Landscape state.
1 – Setting up the UI
1.1 – Create a MainPage.xaml
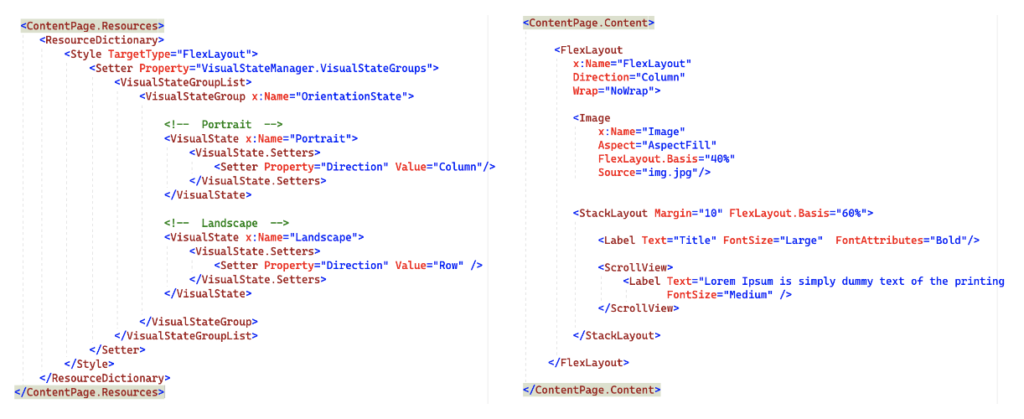
<?xml version="1.0" encoding="utf-8" ?>
<ContentPage xmlns="http://xamarin.com/schemas/2014/forms"
             xmlns:x="http://schemas.microsoft.com/winfx/2009/xaml"
             x:Class="XFHandleViewOnOrientationChangeSample.MainPage">

     <ContentPage.Resources>
        <ResourceDictionary>
            <Style TargetType="FlexLayout">
                <Setter Property="VisualStateManager.VisualStateGroups">
                    <VisualStateGroupList>
                        <VisualStateGroup x:Name="OrientationState">

                            <!--  Portrait  -->
                            <VisualState x:Name="Portrait">
                                <VisualState.Setters>
                                    <Setter Property="Direction" Value="Column"/>
                                </VisualState.Setters>
                            </VisualState>

                            <!--  Landscape  -->
                            <VisualState x:Name="Landscape">
                                <VisualState.Setters>
                                    <Setter Property="Direction" Value="Row" />
                                </VisualState.Setters>
                            </VisualState>

                        </VisualStateGroup>
                    </VisualStateGroupList>
                </Setter>
            </Style>
        </ResourceDictionary>
    </ContentPage.Resources>

    <ContentPage.Content>

         <FlexLayout
            x:Name="FlexLayout"
            Direction="Column"
            Wrap="NoWrap">

            <Image
                x:Name="Image"
                Aspect="AspectFill"
                FlexLayout.Basis="40%"
                Source="img.jpg"/>


            <StackLayout Margin="10" FlexLayout.Basis="60%">

                <Label Text="Title" FontSize="Large"  FontAttributes="Bold"/>

                <ScrollView>
                    <Label Text="Lorem Ipsum is simply dummy text of the printing and typesetting industry.Lorem Ipsum has been the industry's standard dummy text ever since the 1500s,when an unknown printer took a galley of type and scrambled it to make a type specimen book.It has survived not only five centuries, but also the leap into electronic typesetting, remaining essentially unchanged."
                           FontSize="Medium" />
                </ScrollView>

            </StackLayout>

        </FlexLayout>

    </ContentPage.Content>


</ContentPage>
- As in the above MainPage.xaml I set FlexLayout direction to ‘Column’ so children of this will appear vertically.
- Here, There are two childrens of FlexLayout that are Image and StackLayout.
1 – Image : I set 40% of the screen to this image by using below code.
| FlexLayout.Basis=”40%” |
Now, This will take 40% height of screen in portrait mode and 40% width of screen in landscape mode.
2 – StackLayout : I set 60% of the screen to this stacklayout by using below code.
| FlexLayout.Basis=”60%” |
Now, This will take 60% height of screen in portrait mode and 60% width of screen in landscape mode.
- As you will see in MainPage.xaml I used VisualStateManager for managing the states.
- I have created two states:
| Portrait State – For this state I ‘m setting ‘Direction’ as ‘Column’ so children of this will appear vertically. Landscape State – For this state I’m setting ‘Direction’ as ‘Row’ so children of this will appear horizontally. |
- Now, we need to override the OnSizeAllocated() method in MainPage.xaml.cs to get the orientation.
1.2 – MainPage.xaml.cs
namespace XFHandleViewOnOrientationChangeSample
{
    public partial class MainPage : ContentPage
    {
        public MainPage()
        {
            InitializeComponent();
        }

        protected override void OnSizeAllocated(double width, double height)
        {
            base.OnSizeAllocated(width, height);

            if (width > height)
            {
                // Landscape
                VisualStateManager.GoToState(FlexLayout, "Landscape");
            }
            else
            {
                // Portrait
                VisualStateManager.GoToState(FlexLayout, "Portrait");
            }
        }
    }
}
- In this override method based on orientation I’m just switching the states. That’s all 😀
2 – Result
That’s all for now!
You can check the full source code here.
Happy Coding! 😀
You may also like

How to use Field Modifiers in MAUI
How to get Device and App Informations in MAUI