
The Xamarin.CommunityToolkit DockLayout in MAUI is a layout where children can be docked to the sides of the layout container. Children are docked at one of 4 possible docking positions Top, Bottom, Left or Right. Child that are not explicitly docked or (with ‘None‘) are displayed at the center.
In this article, I’m going to show you how to use DockLayout in MAUI Community Toolkit.
Let’s Start
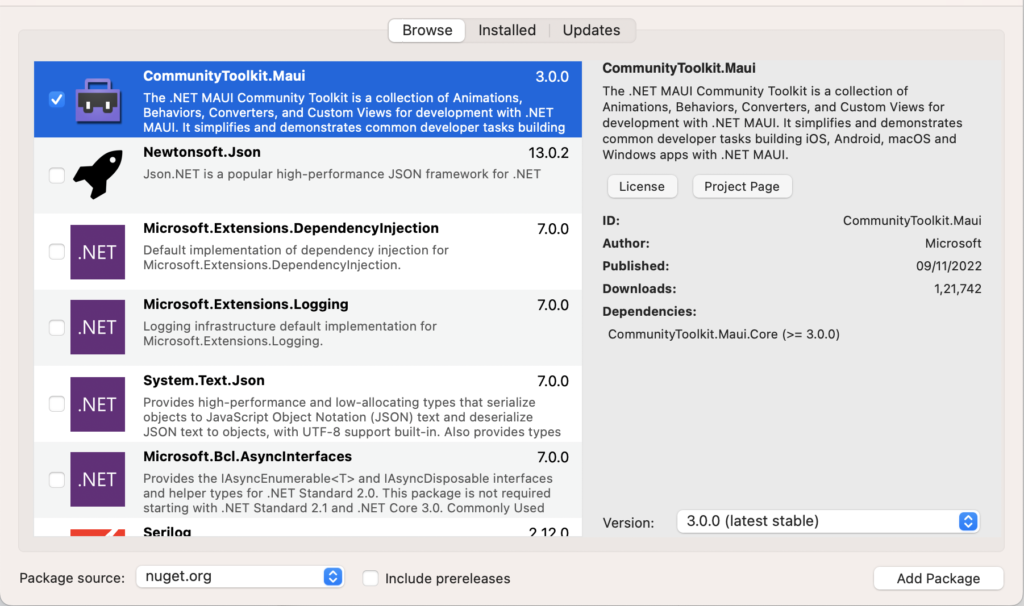
In this sample demo we will use CommunityToolkit.Maui nuget package.
CommunityToolkit.Maui
CommunityToolkit.Maui is a collection of Converters, Behaviours, Animations, Custom Views, Effects, Helpers etc. It simplifies the developers task when building Android, iOS, macOS and WinUI applications using MAUI.
1 – Install CommunityToolkit.Maui nuget package
2 – In order to use the .NET MAUI Community Toolkit you need to call the extension method in your MauiProgram.cs file as follows:
using CommunityToolkit.Maui;
using Microsoft.Extensions.Logging;

namespace MAUIDockLayoutSample;

public static class MauiProgram
{
	public static MauiApp CreateMauiApp()
	{
		var builder = MauiApp.CreateBuilder();
		builder
			.UseMauiApp<App>()
			.UseMauiCommunityToolkit()
            .ConfigureFonts(fonts =>
			{
				fonts.AddFont("OpenSans-Regular.ttf", "OpenSansRegular");
				fonts.AddFont("OpenSans-Semibold.ttf", "OpenSansSemibold");
			});

#if DEBUG
		builder.Logging.AddDebug();
#endif

		return builder.Build();
	}
}
3 – Setting up the UI
3.1 – Create a MainPage.xaml
<?xml version="1.0" encoding="utf-8" ?>
<ContentPage xmlns="http://schemas.microsoft.com/dotnet/2021/maui"
             xmlns:x="http://schemas.microsoft.com/winfx/2009/xaml"
             xmlns:toolkit="http://schemas.microsoft.com/dotnet/2022/maui/toolkit"
             x:Class="MAUIDockLayoutSample.MainPage">

    <toolkit:DockLayout VerticalOptions="FillAndExpand" HorizontalOptions="FillAndExpand">

        <StackLayout toolkit:DockLayout.DockPosition="Top" BackgroundColor="#ffcc61" HeightRequest="70">
            <Label Text="Header" TextColor="Black" FontSize="Large" FontAttributes="Bold" HorizontalOptions="Center" VerticalOptions="CenterAndExpand"/>
        </StackLayout>
        <StackLayout toolkit:DockLayout.DockPosition="Bottom" BackgroundColor="#cdaeb4" HeightRequest="70">
            <Label Text="Footer" TextColor="Black" FontSize="Large" FontAttributes="Bold" HorizontalOptions="Center" VerticalOptions="CenterAndExpand"/>
        </StackLayout>
         <StackLayout toolkit:DockLayout.DockPosition="Left" BackgroundColor="#83888e" WidthRequest="80">
            <Label Text="Left" TextColor="Black" FontSize="Large" FontAttributes="Bold" HorizontalOptions="Center" VerticalOptions="CenterAndExpand"/>
        </StackLayout>
         <StackLayout toolkit:DockLayout.DockPosition="Right" BackgroundColor="#abc8c2" WidthRequest="80" HorizontalOptions="FillAndExpand">
            <Label Text="Right" TextColor="Black" FontSize="Large" FontAttributes="Bold" HorizontalOptions="Center" VerticalOptions="CenterAndExpand"/>
        </StackLayout>
         <Image
             Source="dotnet_bot.png"
             HeightRequest="180"
             WidthRequest="180"
             HorizontalOptions="CenterAndExpand"
             VerticalOptions="CenterAndExpand"
             />
    </toolkit:DockLayout>

</ContentPage>
3.2 – MainPage.xaml.cs
namespace MAUIDockLayoutSample;

public partial class MainPage : ContentPage
{
    public MainPage()
    {
	InitializeComponent();
    }
}
Now, We have completed the coding, Let’s try to run the application.
4 – Result
That’s all for now!
You can check the full source code here.
Happy Coding! 😀
You may also like
How to check internet connection continuously in Xamarin Forms

How to use Field Modifiers in MAUI